ФПТМ
Ш§ЁЂЭЈЙ§жИЖЈЙЙдьЦїЮЊBeanзЂШыЪєад
ЫФЁЂЭЈЙ§pУќУћПеМфЮЊBeanзЂШыЪєад
ЮхЁЂЭЈЙ§refв§гУЪЕЯжBeanЕФЯрЛЅв§гУ
7.ListЪєадзЂШыжЎЭЈЙ§utilУќУћПеМфзЂШы :
ЪЎЁЂЙигкBeanХфжУЕФИќЖрФкШнКЭЯИНк
вЛЁЂЧАбд
- ЕкЖўНкФкШнЃЌupДђЫуКЭДѓМвЗжЯэвЛЯТSpring IOCЁЊЁЊЛљгкXMLЗНЪНЖдBeanЕФХфжУКЭЙмРэЁЃ(PS: ШєЖдXMLЮФМўЮДдјСЫНтЃЌПЩвдШЅПьЫйдФЖСвЛЯТupЕФЁАЫйЭЈXMLЁБвЛЮФЁЃ)
- зЂвтЪТЯюЁЊЁЊЂйДњТыжаЕФзЂЪЭвВКмживЊЃЛЂкВЛвЊблИпЪжЕЭЃЌздМКИњзХЙ§вЛБщВХгаЪеЛёЃЛЂлЕуЛїЮФеТЕФВрБпРИФПТМЛђепЮФеТПЊЭЗЕФФПТМПЩвдНјааЬјзЊЁЃ
- СМЙЄВЛЪОШЫвдЦгЃЌЫљгаЮФеТЖМЛсЪЪЪБВЙГфЭъЩЦЁЃДѓМвШчЙћгаЮЪЬтЖМПЩвддкЦРТлЧјНјааНЛСїЛђепЫНаХupЁЃИааЛдФЖСЃЁ
ЖўЁЂЭЈЙ§РраЭРДЛёШЁBean
0.змЪіЃЈживЊЃЉ :
(1) SpringЖдBeanЕФЙмРэжївЊАќРЈСНЗНУцФкШнЁЊЁЊДДНЈbeanЖдЯѓ КЭ ЮЊbeanзЂШыЪєадЁЃ
(2) SpringЖдBeanЕФХфжУЗНЪНвВжївЊЪЧСНжжЁЊЁЊЛљгкXMLЮФМўХфжУЕФЗНЪН КЭ ЛљгкзЂНтХфжУЕФЗНЪНЁЃ
(3) ЩЯвЛаЁНкжаЃЌЮвУЧвбОбнЪОЙ§ЁАЭЈЙ§idЪєадРДЛёШЁbeanЖдЯѓЁБЕФЗНЪН(Лљгкbeans.xmlХфжУЮФМў)ЃЌвђДЫетвЛаЁНкЃЌЮвУЧжБНгбнЪОЦфЫћЗНЪНЃЈетвЛаЁНкОљЪЧЛљгкXMLЮФМўХфжУЕФЗНЪНЃЉЁЃ
1.ЛљБОНщЩм :
(1) ЭЈЙ§РраЭРДЛёШЁbeanЖдЯѓЃЌЦфЪЕЪЧЕїгУСЫgetBean(Class<T> aClass)ЗНЗЈЃЌИУЗНЗЈгыЮвУЧЩЯвЛаЁНкжабнЪОЕФЁАЭЈЙ§idЛёШЁbeanЖдЯѓЁБЕФЗНЗЈЙЙГЩжидиЃЌШчЯТЭМЫљЪО :
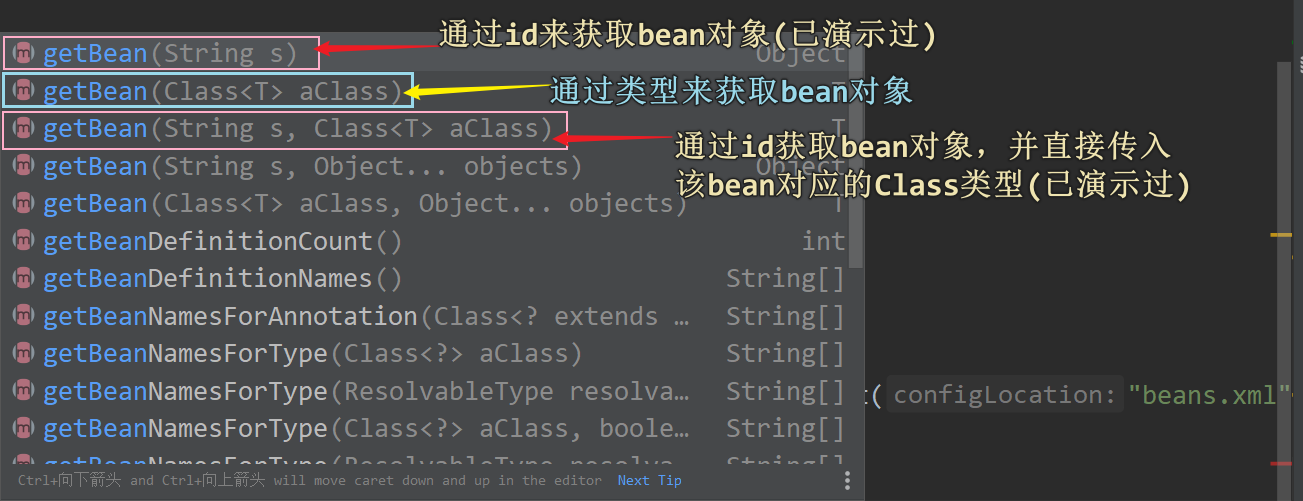
БрМ
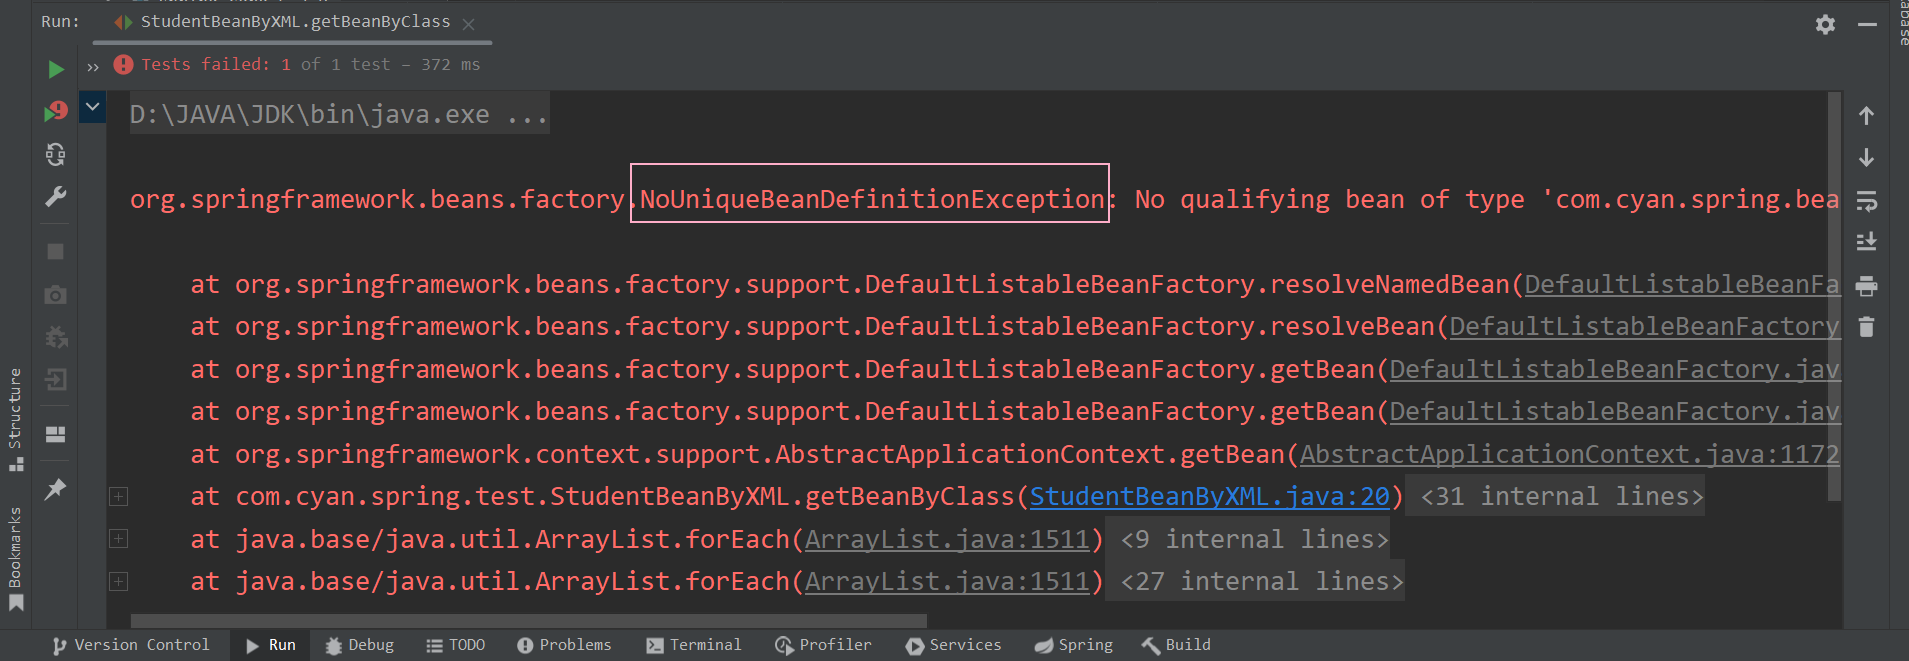
(2) ЭЈЙ§РраЭРДЛёШЁbeanЪБЃЌвЊЧѓiocШнЦїжаЭЌвЛРраЭЕФbeanЖдЯѓжЛФмгавЛИіЃЌЗёдђЛсХзГівьГЃNoUniqueBeanDefinitionExceptionЃЈВЛЮЈвЛBeanЖЈвхвьГЃЃЉЃЌШчЯТЭМЫљЪО :
БрМ
(3) ЁАЭЈЙ§РраЭЛёШЁBeanЁБЗНЪНЕФЪЪгУГЁОАЁЊЁЊдквЛИіЯпГЬжажЛашвЊвЛИіЖдЯѓЪЕР§ЃЈЕЅР§ЃЉЕФЧщПіЃЌeg : XxxAction / Servlet / Controller / XxxServiceЁЃ
(4) PS : дкШнЦїХфжУЮФМў(eg : beans.xml)жаИјbeanЖдЯѓЕФЪєадИГжЕЃЌЕзВуЪЧЭЈЙ§setterЗНЗЈЭъГЩЕФЃЌвђДЫЮвУЧЖЈвхЕФJavaBeanЃЈБШШчжЎЧАЕФStudentЃЉРржаЃЌБиаыЬсЙЉЯргІЕФsetterЗНЗЈЃЌЗёдђБЈДэЁЃ
2.гІгУЪЕР§ :
ашЧѓ : дкbeans.xmlХфжУЮФМўжаХфжУвЛИіbeanЖдЯѓЃЌВЂЭЈЙ§ClassРраЭЕФЗНЪНРДЛёШЁЕНИУbeanЖдЯѓЁЃ
ЪзЯШЃЌЮвУЧашвЊДДНЈвЛИіJavaBeanРрЃЌвдStudentРрЮЊР§ЃЌStudentРрДњТыШчЯТ :
package com.cyan.spring.bean; /** * @author : Cyan_RA9 * @version : 21.0 */ public class Student { private String name; private int age; private int score; //PS : ЮоВЮЙЙдьЦїБиаыИјГіЃЌвђЮЊЕзВувЊЭЈЙ§ЗДЩфРДДДНЈЖдЯѓЁЃ public Student() { } public Student(String name, int age, int score) { this.name = name; this.age = age; this.score = score; } public String getName() { return name; } public void setName(String name) { this.name = name; } public int getAge() { return age; } public void setAge(int age) { this.age = age; } public int getScore() { return score; } public void setScore(int score) { this.score = score; } public String toString() { return "Student{" + "name='" + name + '\'' + ", age=" + age + ", score=" + score + '}'; } }

ШЛКѓЃЌдкbeans.xmlХфжУЮФМўжаЃЌХфжУвЛИіStudentРрЖдЯѓЃЌbeans.xmlДњТыШчЯТ :
<?xml version="1.0" encoding="UTF-8"?> <beans xmlns="http://www.springframework.org/schema/beans" xmlns:xsi="http://www.w3.org/2001/XMLSchema-instance" xsi:schemaLocation="http://www.springframework.org/schema/beans http://www.springframework.org/schema/beans/spring-beans.xsd"> <!-- (1) дкИљдЊЫиbeansжаЃЌЭЈЙ§<bean></bean>згдЊЫиРДХфжУJavaBeanЖдЯѓЁЃ УПХфжУвЛИіbeanЃЌЯрЕБгкХфжУСЫвЛИіJavaЖдЯѓЁЃ (2) beanзгдЊЫиашвЊХфжУСНИіЪєадЁЊЁЊЁЊclass КЭ idЁЃЦфжаЃЌ classБэЪОЫљвЊЪЕР§ЛЏРрЕФе§Ућ(ШЋРрУћ); idБэЪОИУЖдЯѓдкSpringШнЦїжаЕФБъЪЖЃЌЭЈЙ§idПЩвдЛёШЁЕНЖдЯѓЁЃ (3) propertyзгдЊЫигУгкХфжУИУЖдЯѓЕФГЩдББфСП(ЖдЯѓЕФЪєад)ЃЌЦфжаЃЌ nameБэЪОЪєадУћГЦЃЌvalueБэЪОЪєадЕФжЕЁЃ (4) XMLФкШнЛиЙЫЁЊЁЊЁЊШєвЛИіБъЧЉУЛгаБъЧЉЬхЃЌвд<age></age>ЮЊР§ЃЌПЩвдМђаДЮЊ<age/>ЁЃ --> <!-- зЂвтЁЊЁЊЁЊДЫДІЮвУЧУЛгаЮЊbeanБъЧЉХфжУidЪєадЃЌФЌШЯЕФЗжХфidЮЊЃКШЋРрУћ#0 --> <bean class="com.cyan.spring.bean.Student"> <property name="name" value="Rain"></property> <property name="age" value="19"></property> <property name="score" value="439"></property> </bean> </beans>

НгзХЃЌдкВтЪдРржаЕїгУgetBean(Class<T> aClass)ЗНЗЈЃЌвдStudentBeanByXMLРрЮЊВтЪдРрЃЌЭЈЙ§JUnitПђМмНјааЕЅдЊВтЪдЃЌStudentBeanByXMLРрДњТыШчЯТ :
package com.cyan.spring.test; import com.cyan.spring.bean.Student; import org.junit.jupiter.api.Test; import org.springframework.context.ApplicationContext; import org.springframework.context.support.ClassPathXmlApplicationContext; /** * @author : Cyan_RA9 * @version : 21.0 */ public class StudentBeanByXML { //1.ЭЈЙ§РраЭРДЛёШЁBean public void getBeanByClass() { //(1) ЛёШЁSpringШнЦїЖдЯѓ //IOC : Inversion Of Control ApplicationContext ioc = new ClassPathXmlApplicationContext("beans.xml"); //(2) ЭЈЙ§JavaBeanЕФРраЭРДЛёШЁbean Student bean = ioc.getBean(Student.class); //(3) ДђгЁГіЛёШЁЕНЕФbeanЖдЯѓЕФаХЯЂ System.out.println(bean); } }

дЫааНсЙћ :
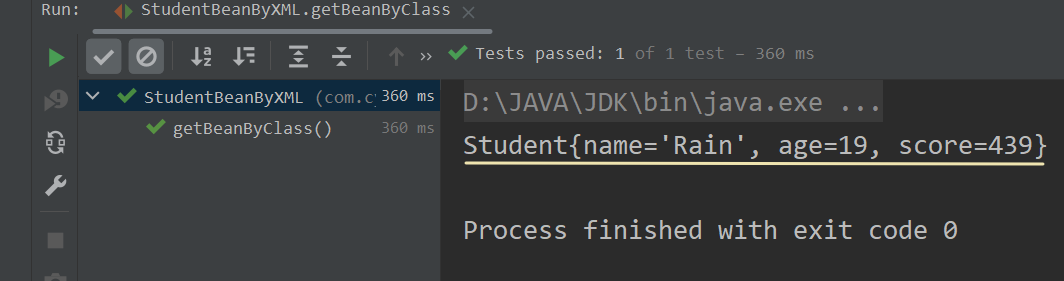
 БрМ
БрМ
Ш§ЁЂЭЈЙ§жИЖЈЙЙдьЦїЮЊBeanзЂШыЪєад
1.ЛљБОНщЩм :
ЁАЭЈЙ§жИЖЈЙЙдьЦїЮЊBeanзЂШыЪєадЁБЃЌМДдкbeans.xmlХфжУЮФМўжаЭЈЙ§<constructor-arg/>БъЧЉРДжИЖЈвЛИіJavaBeanжаЕФДјВЮЙЙдьЃЌРћгУИУДјВЮЙЙдьРДЭъГЩЖдBeanЕФЪєадЕФГѕЪМЛЏЃЌЦфХфжУЗНЪНБОжЪШдШЛЪЧЁАIOCЁЊЁЊЛљгкXMLЮФМўХфжУBeanЁБЁЃШчЯТЭМЫљЪО :

БрМ
ЩЯЭМжабнЪОЕФЮЊЭЈЙ§indexЫїв§РДШЗЖЈВЮЪ§ЃЌЛЙПЩвдЭЈЙ§typeРраЭЛђепnameЪєадУћРДШЗЖЈВЮЪ§ЃЌБОжЪЖМЪЧИљОнаЮВЮРДЮЈвЛШЗЖЈвЛИіДјВЮЙЙдьЁЃ
2.гІгУЪЕР§ :
ашЧѓ : дкbeans.xmlЮФМўжааТХфжУвЛИіBeanЖдЯѓЃЌВЂЭЈЙ§<constructor-arg/>БъЧЉжИЖЈStudentРрЕФвЛИіДјВЮЙЙдьРДГѕЪМЛЏИУBeanЕФЪєадЁЃдкStudentBeanByXMLРржааТЖЈвхвЛИіЕЅдЊВтЪдЗНЗЈЃЌЭЈЙ§idЪєадЛёШЁЕНИУBeanЖдЯѓЃЌВЂМьВтЪєадзЂШыЪЧЗёГЩЙІЁЃ
ШдШЛЪЙгУStudentРрзїЮЊJavaBeanРрЃЌЪзЯШЮвУЧвЊдкbeans.xmlЮФМўжаХфжУBeanЖдЯѓЃЌupЮЊСЫбнЪОвЛЯТindex, type, nameШ§жжаЮЪНЕФ<constructor-arg/>БъЧЉЃЌДЫДІХфжУСЫШ§ИіBeanЖдЯѓЃЌДњТыШчЯТ :
<bean class="com.cyan.spring.bean.Student" id="stu03">
        <constructor-arg value="Cyan" index="0"></constructor-arg>
        <constructor-arg value="21" index="1"></constructor-arg>
        <constructor-arg value="453" index="2"></constructor-arg>
    </bean>
    <bean class="com.cyan.spring.bean.Student" id="stu04">
        <constructor-arg value="Eisen" type="java.lang.String"></constructor-arg>
        <constructor-arg value="21" type="int"></constructor-arg>
        <constructor-arg value="442" type="int"></constructor-arg>
    </bean>
    <bean class="com.cyan.spring.bean.Student" id="stu05">
        <constructor-arg value="Five" name="name"></constructor-arg>
        <constructor-arg value="20" name="age"></constructor-arg>
        <constructor-arg value="460" name="score"></constructor-arg>
    </bean>

НгзХЃЌдкStudentBeanByXMLРржааТЖЈвхвЛИіЗНЗЈЃЌЗжБ№ЛёШЁЕНid = stu03, id = stu04, id = stu05ЕФЖдЯѓЃЌinsertPropertiesByConstructor()ЗНЗЈДњТыШчЯТ :
//2.ЭЈЙ§жИЖЈЙЙдьЦїЮЊBeanзЂШыЪєад //ЛиЙЫЁЊЁЊЁЊЁЊ //ЖдBeanЕФЙмРэАќРЈСНЗНУц (1) ДДНЈbeanЖдЯѓЃЛ(2) ЮЊbeanЖдЯѓзЂШыЪєадЁЃ public void insertPropertiesByConstructor() { ApplicationContext ioc = new ClassPathXmlApplicationContext("beans.xml"); Student stu03 = ioc.getBean("stu03", Student.class); Student stu04 = ioc.getBean("stu04", Student.class); Student stu05 = ioc.getBean("stu05", Student.class); System.out.println("stu03 = " + stu03); System.out.println("stu04 = " + stu04); System.out.println("stu05 = " + stu05); }

дЫааНсЙћ :

 БрМ
БрМ
ПЩвдПДЕНЃЌДђгЁГіЕФЪєаджЕгыЮвУЧХфжУЕФвЛжТЃЌЫЕУїДјВЮЙЙдьГЩЙІГѕЪМЛЏИУbeanЖдЯѓЁЃ
ЫФЁЂЭЈЙ§pУќУћПеМфЮЊBeanзЂШыЪєад
1.ЛљБОНщЩм :
ЧАЮФжагУ<bean></bean>БъЧЉХфжУBeanЖдЯѓЪБЃЌЮвУЧгУЕНСЫclassЪєад(JavaBeanЕФШЋРрУћ)ЃЌidЪєад(ЖдЯѓдкШнЦїжаЕФБъЪЖ)ЁЃЯждкЮвУЧПЩвдгУ"p:property_name = property_value"(зЂвтУАКХ)ЕФаЮЪНЃЌжБНгдкbeanБъЧЉФкВПЮЊBeanзЂШыЪєадЃЌЕЋжБНгЪЙгУЛсБЈДэЃЌШчЯТЭМЫљЪО :

БрМ
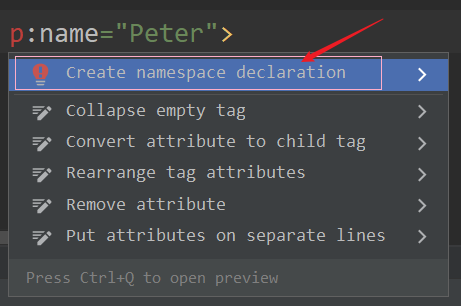
БЈДэЬсЪО : "Namespace 'p' is not bound"ЃЈУќУћПеМфpЮДАѓЖЈЃЉЁЃ
НтОіЗНЗЈ : НЋЪѓБъаќЭЃдкБЈДэДІЃЌАДЯТAlt + EnterЃЌбЁдё"Create namespace declaration"ЃЈДДНЈУќУћПеМфЩљУїЃЉЃЌШчЯТЭМЫљЪО :
БрМ
ДДНЈУќУћПеМфЩљУїКѓЃЌ ПЩвдПДЕНbeans.xmlИљдЊЫижавбОздЖЏМгШыСЫpУќУћПеМфЕФЩљУїЃЌШчЯТЭМЫљЪО :

БрМ
2.гІгУЪЕР§ :
ашЧѓ : дкbeans.xmlЮФМўжааТХфжУвЛИіBeanЖдЯѓЃЌВЂЭЈЙ§pУќУћПеМфЮЊИУЖдЯѓзЂШыЪєадЁЃдкStudentBeanByXMLРржааТЖЈвхвЛИіЕЅдЊВтЪдЗНЗЈЃЌДђгЁИУЖдЯѓаХЯЂЃЌМьВтЪєадзЂШыЪЧЗёГЩЙІЁЃ
ШдШЛЪЙгУStudentРрзїЮЊJavaBeanРрЃЌЪзЯШЮвУЧвЊдкbeans.xmlЮФМўжаХфжУBeanЖдЯѓЃЌДњТыШчЯТ :
<bean class="com.cyan.spring.bean.Student" id="stu06" p:name="Peter" p:age="33" p:score="1024">
    </bean>

НгзХЃЌдкStudentBeanByXMLВтЪдРржааТЖЈвхвЛИіЗНЗЈЃЌЛёШЁЕНid = stu06ЕФЖдЯѓЃЌinjectPropertiesByP()ЗНЗЈДњТыШчЯТ :
//3.ЭЈЙ§pУќУћПеМфЮЊBeanзЂШыЪєад public void injectPropertiesByP() { ApplicationContext ioc = new ClassPathXmlApplicationContext("beans.xml"); Student stu06 = ioc.getBean("stu06", Student.class); System.out.println("stu06 = " + stu06); }

дЫааНсЙћ :

 БрМ
БрМ
ЮхЁЂЭЈЙ§refв§гУЪЕЯжBeanЕФЯрЛЅв§гУ
1.ЛљБОНщЩм :
(1) дкJavaWebжаЃЈБШЗНЫЕЮвУЧжЎЧАЕФWebЯюФПЁЊЁЊГОИшКјАкЩшЙКТђЯЕЭГЃЉЃЌЮвУЧРћгУЁАЗжВуЩшМЦЁБЕФЫМЯыЃЌЛсЗжБ№НЈСЂDAOВуЃЌServiceВуЃЌWebВуЃЛВЂИљОнЁАWebВуЕїгУServiceВуЃЌServiceВуЕїгУDAOВуЁБЕФЫМЯыЃЌдкXxxServletРржаnewвЛИіXxxServiceЖдЯѓЃЌдкXxxServiceРржаnewвЛИіXxxDaoЖдЯѓЁЃШчЯТЭМЫљЪО :

БрМ
(2) ЖјгаСЫSpringЕФМгГжКѓЃЌЮвУЧПЩвдЭЈЙ§refЃЈв§гУЃЉРДЪЕЯжIOCШнЦїжаbeanЖдЯѓЕФЯрЛЅв§гУЃЌЦфБОжЪЪЧЭЈЙ§refв§гУРДЮЊвЛИіЖдЯѓЕФв§гУРраЭЕФЪєадНјааГѕЪМЛЏЃЌМДЪєгкЁАBeanЙмРэЁЊЁЊЮЊbeanзЂШыЪєадЁБЕФЗЖГыЁЃ
(3) refдкЪЙгУЪБЃЌЪЧзїЮЊpropertyБъЧЉЕФвЛИіЪєадЃЈЮвУЧжЎЧАвбОЖрДЮгУЕНСЫpropertyБъЧЉЃЉЃЌИёЪНШчЯТ :
<property name="property_name" ref="otherBeans id"></property>ЃЈИќЖрЫЕУїМћbeans.xmlжаЕФзЂЪЭЃЉ
2.гІгУЪЕР§ :
ашЧѓ : ВЮеежЎЧАJavaWebжаЁАЗжВуЩшМЦЁБЕФЫМЯыЃЌдкServiceВужаЕїгУDAOВуЃЌЕЋЪЧВЛжБНгnewГіЪЕР§ЃЌЖјЪЧдкbeans.xmlЮФМўжаЭЈЙ§refНјааХфжУЃЌЪдзХИљОнЪфГігяОфЃЌВтЪдзЂШыЪєадЪЧЗёГЩЙІЁЃ
ЪзЯШЃЌЮвУЧашвЊДДНЈгУгкВтЪдЕФServiceВуКЭDAOВуЕФРрЃЌвдЮвУЧжЎЧАЕФГОИшКјАкЩшЙКТђЯЕЭГЮЊВЮПМЃЌШчЯТЭМЫљЪО :
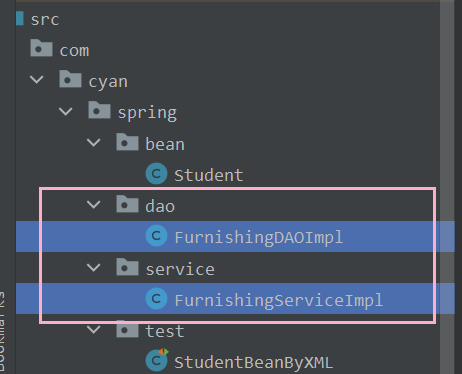
 БрМ
БрМ
FurnishingDAOImplРрДњТыШчЯТ : ЃЈЖЈвхСЫвЛИігУгкЬэМгАкЩшЕФaddFurnishingЗНЗЈЃЉ
package com.cyan.spring.dao; /** * @author : Cyan_RA9 * @version : 21.0 */ public class FurnishingDAOImpl { public FurnishingDAOImpl() { System.out.println("FurnishingDAOImplЕФЮоВЮЙЙдьБЛЕїгУ~"); } public void addFurnishing() { System.out.println("FurnishingDAOImplЕФaddFurnishingЗНЗЈБЛЕїгУ~"); } }

FurnishingServiceImplРрДњТыШчЯТ : ЃЈЖЈвхСЫвЛИіFurnishingDAOImplРраЭЕФЪєадЃЌЮвУЧНЋдкbeans.xmlЮФМўжаЖдЦфНјааГѕЪМЛЏЃЛДЫЭтЃЌЖЈвхaddFurnishing()ЗНЗЈЃЌЪЕЯжServiceВуЕїгУDAOВуЃЉ
package com.cyan.spring.service; import com.cyan.spring.dao.FurnishingDAOImpl; /** * @author : Cyan_RA9 * @version : 21.0 */ public class FurnishingServiceImpl { //ServiceВуЕїгУDAOВуЃЈЕЋЭЈЙ§beans.xmlЮФМўНјааХфжУЃЉ private FurnishingDAOImpl furnishingDAO; public FurnishingServiceImpl() { } //About DAO's setter,getter public FurnishingDAOImpl getFurnishingDAO() { return furnishingDAO; } public void setFurnishingDAO(FurnishingDAOImpl furnishingDAO) { this.furnishingDAO = furnishingDAO; } //Add Furnishing public void addFurnishing() { System.out.println("FurnishingServiceImplЕФaddFurnishing()ЗНЗЈБЛЕїгУ~"); furnishingDAO.addFurnishing(); } }

дкbeans.xmlжаЗжБ№ХфжУетСНИіРрЕФЖдЯѓЃЌДњТыШчЯТ : ЃЈзЂвтПДзЂЪЭЃЉ
<!-- (1) ХфжУвЛИіFurnishingDAOImplЖдЯѓ; (2) гЩгкИУРрднЪБУЛгаЩшжУЪєадЃЌЫљвдДЫДІВЛашвЊзЂШыЪєад --> <bean class="com.cyan.spring.dao.FurnishingDAOImpl" id="furnishingDAO01"/> <!-- (1) ХфжУвЛИіFurnishingServiceImplЖдЯѓ; (2) ШдШЛЪЧЭЈЙ§propertyзгдЊЫиРДЮЊid = furnishingService01ЕФЖдЯѓзЂШыЪєад, зЂвтЃЌДЫДІЕФ"ref" БэЪОЁЊЁЊЁЊЁЊ id = furnishingService01ЕФЖдЯѓЕФfurnishingDAOЪєадЃЌ в§гУСЫЩЯУцХфжУЕФid = furnishingDAO01ЕФЖдЯѓ PS : refЬхЯжСЫSpringЕФвРРЕзЂШы(МДвЛИіЖдЯѓЕФЪєадЃЌв§гУСЫСэвЛИіЖдЯѓ) --> <bean class="com.cyan.spring.service.FurnishingServiceImpl" id="furnishingService01"> <property name="furnishingDAO" ref="furnishingDAO01"></property> </bean>

зюКѓЃЌШдЪЧдкStudentBeanByXMLВтЪдРржааТЖЈвхвЛИіЕЅдЊВтЪдЗНЗЈЃЌВтЪдFurnishingServiceImplЕФFurnishingDAOImplЪєадЪЧЗёБЛГѕЪМЛЏЁЃ
injectPropertiesByRef()ЗНЗЈДњТыШчЯТ :
//4.ЭЈЙ§refв§гУЪЕЯжBeanЕФЯрЛЅв§гУ public void injectPropertiesByRef() { ApplicationContext ioc = new ClassPathXmlApplicationContext("beans.xml"); FurnishingServiceImpl furnishingService01 = ioc.getBean("furnishingService01", FurnishingServiceImpl.class); furnishingService01.addFurnishing(); }

дЫааНсЙћ :

 БрМ
БрМ
ПЩвдПДЕНЃЌFurnishingDAOImplРрЕФЮоВЮЙЙдьГЩЙІБЛЕїгУЃЌЫЕУїЫќБЛГЩЙІГѕЪМЛЏЁЃ
ЦфЪЕЃЌГ§СЫЪЙгУrefЪєадЭтЃЌЛЙПЩвджБНгЭЈЙ§ХфжУФкВПbeanРДЭъГЩЖдЪєадЕФГѕЪМЛЏЃЌШчЯТЫљЪО :
<bean class="com.cyan.spring.service.FurnishingServiceImpl" id="furnishingService02">
        <property name="furnishingDAO">
            <bean class="com.cyan.spring.dao.FurnishingDAOImpl"/>
        </property>
    </bean>

етжжЗНЗЈЕФвтЫМЪЧЃЌЖдв§гУРраЭЪєадЕФГѕЪМЛЏВЛдйЪЙгУSpringШнЦїжавбОХфжУКУЕФЖдЯѓЃЌЖјЪЧздМКжиаТХфжУвЛИіbeanЁЃОЙ§ВтЪдЃЌХфжУФкВПbeanЕФЗНЗЈвВПЩвдГЩЙІзЂШыЃЌДѓМвгааЫШЄПЩвдздМКШЅЪдЪдЁЃ
СљЁЂЖдBeanзЂШыЪєадЕФФкШнбгЩь
1.зМБИЙЄзї :
ЩЯЮФжаЮвУЧвбОбнЪОЙ§ЖржжЮЊbeanзЂШыЪєадЕФЗНЪНЃЌБШШчЁАЭЈЙ§жИЖЈЙЙдьЦїзЂШыЁБЃЌЁАЭЈЙ§pУќУћПеМфзЂШыЁБЃЌЁАЭЈЙ§refв§гУЪЕЯжBeanЕФЯрЛЅв§гУЁБЕШЁЃЯждкЃЌШУЮвУЧРДЬжТлвЛЯТЃЌШчЙћbeanЖдЯѓЕФЪєадЪЧЪ§зщЛђепМЏКЯРраЭЃЌЮвУЧгжИУдѕбљШЅзЂШыФиЃП
ЮЊСЫЪЕЯжЁАзЂШыЪ§зщ or МЏКЯРраЭЕФЪєадЁБЃЌЮвУЧЯШРДДДНЈвЛИіРрШЅЮЌЛЄетаЉЪєадЃЌSchoolРрДњТыШчЯТ :
package com.cyan.spring.bean; import java.util.*; /** * @author : Cyan_RA9 * @version : 21.0 */ public class School { private List<Student> studentList; private Set<Student> studentSet; private Map<String, Student> studentMap; private String[] studentNames; private Properties pros; public School() { } public School(List<Student> studentList, Set<Student> studentSet, Map<String, Student> studentMap, String[] studentNames, Properties pros) { this.studentList = studentList; this.studentSet = studentSet; this.studentMap = studentMap; this.studentNames = studentNames; this.pros = pros; } public List<Student> getStudentList() { return studentList; } public void setStudentList(List<Student> studentList) { this.studentList = studentList; } public Set<Student> getStudentSet() { return studentSet; } public void setStudentSet(Set<Student> studentSet) { this.studentSet = studentSet; } public Map<String, Student> getStudentMap() { return studentMap; } public void setStudentMap(Map<String, Student> studentMap) { this.studentMap = studentMap; } public String[] getStudentNames() { return studentNames; } public void setStudentNames(String[] studentNames) { this.studentNames = studentNames; } public Properties getPros() { return pros; } public void setPros(Properties pros) { this.pros = pros; } public String toString() { return "School{" + "studentList=" + studentList + ", studentSet=" + studentSet + ", studentMap=" + studentMap + ", studentNames=" + Arrays.toString(studentNames) + ", pros=" + pros + '}'; } }

НгзХЃЌЮвУЧдкbeans.xmlжаХфжУвЛИіSchoolРраЭЕФBeanЖдЯѓЃЌДњТыШчЯТ :
<bean class="com.cyan.spring.bean.School" id="school01"> <!-- днЮДИјЪєадИГжЕ --> </bean>

2.зЂШыListРраЭЕФЪєад :
дкИеИеХфжУЕФid = school01ЕФbeanЖдЯѓжаЃЌЭЈЙ§propertyБъЧЉЮЊListРраЭЕФЪєадГѕЪМЛЏЃЌДњТыШчЯТ :
<property name="studentList">
            <list>
                <ref bean="stu03"></ref>
                <ref bean="stu04"></ref>
            </list>
        </property>

зЂвтЃЌГ§СЫ"ЭЈЙ§refдЊЫиХфжУ"ЕФаЮЪНЭтЃЌвВПЩвддкListдЊЫижажБНгХфжУФкВПBeanЁЃШдШЛЪЧдкStudentBeanByXMLВтЪдРржаЃЌЮвУЧаТЖЈвхвЛИіЗНЗЈВтЪдListЪєадЪЧЗёзЂШыГЩЙІЃЌinjectList()ЗНЗЈДњТыШчЯТ :
//5.ЮЊBeanзЂШыМЏКЯ or Ъ§зщРраЭЕФЪєад //5.1 зЂШыListРраЭЕФЪєад public void injectList() { ApplicationContext ioc = new ClassPathXmlApplicationContext("beans.xml"); School school01 = ioc.getBean("school01", School.class); System.out.println("SchoolжаЕФstudentListЪєадШчЯТ : "); System.out.println(school01.getStudentList()); }

дЫааНсЙћ :

 БрМ
БрМ
3.зЂШыSetРраЭЕФЪєад :
дкЁАзМБИЙЄзїЁБжаХфжУЕФid = school01ЕФbeanЖдЯѓжаЃЌЭЈЙ§propertyБъЧЉЮЊSetРраЭЕФЪєадГѕЪМЛЏЃЌДњТыШчЯТ :
<property name="studentSet">
            <set>
                <ref bean="stu03"></ref>
                <ref bean="stu06"></ref>
            </set>
        </property>

ПЩвдПДЕНЃЌSetРраЭЪєадЕФХфжУКЭListРраЭЪєадЕФХфжУЗЧГЃРрЫЦЃЌжЛВЛЙ§етРяЪЧЗХдкsetдЊЫиРяСЫЁЃШдШЛЪЧдкStudentBeanByXMLВтЪдРржаЃЌЮвУЧаТЖЈвхвЛИіЗНЗЈВтЪдSetЪєадЪЧЗёзЂШыГЩЙІЃЌinjectSet()ЗНЗЈДњТыШчЯТ :
//5.2 зЂШыSetРраЭЕФЪєад public void injectSet() { ApplicationContext ioc = new ClassPathXmlApplicationContext("beans.xml"); School school01 = ioc.getBean("school01", School.class); System.out.println("SchoolжаЕФstudentSetЪєадШчЯТ : "); System.out.println(school01.getStudentSet()); }

дЫааНсЙћ :

 БрМ
БрМ
4.зЂШыMapРраЭЕФЪєад :
дкЁАзМБИЙЄзїЁБжаХфжУЕФid = school01ЕФbeanЖдЯѓжаЃЌЭЈЙ§propertyБъЧЉЮЊMapРраЭЕФЪєадГѕЪМЛЏЃЌДњТыШчЯТ :
<property name="studentMap"> <map> <!-- entryБэЪОвЛИіМќжЕЖд --> <entry> <!-- keyдЊЫигУгкХфжУkeyЃЌзЂвтДЫДІЕФvalueЪЧжИkeyЕФжЕЃЌзжУцвтЫМ --> <key> <value>keyStu05</value> </key> <!-- НєИњkeyдЊЫиЦфКѓЕФrefдЊЫиВХЪЧеце§ЕФЕБЧАМќжЕЖдЕФvalueЃЁ --> <ref bean="stu05"></ref> </entry> <entry> <key> <value>keyStu06</value> </key> <ref bean="stu06"></ref> </entry> </map> </property>

ШдШЛЪЧдкStudentBeanByXMLВтЪдРржаЃЌЮвУЧаТЖЈвхвЛИіЗНЗЈВтЪдMapЪєадЪЧЗёзЂШыГЩЙІЃЌinjectMap()ЗНЗЈДњТыШчЯТ :
//5.3 зЂШыMapРраЭЕФЪєад public void injectMap() { ApplicationContext ioc = new ClassPathXmlApplicationContext("beans.xml"); School school01 = ioc.getBean("school01", School.class); System.out.println("SchoolжаЕФstudentMapЪєадШчЯТ : "); System.out.println(school01.getStudentMap()); }

дЫааНсЙћ :

 БрМ
БрМ
5.зЂШыЪ§зщРраЭЕФЪєад :
дкЁАзМБИЙЄзїЁБжаХфжУЕФid = school01ЕФbeanЖдЯѓжаЃЌЭЈЙ§propertyБъЧЉЮЊString[]РраЭЕФЪєадГѕЪМЛЏЃЌДњТыШчЯТ :
<property name="studentNames"> <array> <!-- гЩгкSchoolРржаЮЌЛЄЕФЪ§зщЮЊStringРраЭЃЌЫљвдДЫДІжБНгвдvalueдЊЫиХфжУ --> <value>Cyan</value> <value>Rain</value> <value>Five</value> <value>Ice</value> </array> </property>

ШдШЛЪЧдкStudentBeanByXMLВтЪдРржаЃЌЮвУЧаТЖЈвхвЛИіЗНЗЈВтЪдString[]ЪєадЪЧЗёзЂШыГЩЙІЃЌinjectArray()ЗНЗЈДњТыШчЯТ :
//5.4 зЂШыЪ§зщРраЭЕФЪєад public void injectArray() { ApplicationContext ioc = new ClassPathXmlApplicationContext("beans.xml"); School school01 = ioc.getBean("school01", School.class); System.out.println("SchoolжаЕФstudentNamesЪєадШчЯТ : "); System.out.println(Arrays.toString(school01.getStudentNames())); }

дЫааНсЙћ :

 БрМ
БрМ
6.зЂШыPropertiesРраЭЕФЪєад :
дкЁАзМБИЙЄзїЁБжаХфжУЕФid = school01ЕФbeanЖдЯѓжаЃЌЭЈЙ§propertyБъЧЉЮЊPropertiesРраЭЕФЪєадГѕЪМЛЏЃЌДњТыШчЯТ :
<property name="pros">
            <props>
                <prop key="username">Cyan_RA9</prop>
                <prop key="password">55555233</prop>
                <prop key="ip">127.0.0.1</prop>
            </props>
        </property>

ШдШЛЪЧдкStudentBeanByXMLВтЪдРржаЃЌЮвУЧаТЖЈвхвЛИіЗНЗЈВтЪдPropertiesЪєадЪЧЗёзЂШыГЩЙІЃЌinjectProperties()ЗНЗЈДњТыШчЯТ :
//5.5 зЂШыPropertiesРраЭЕФЪєад public void injectProperties() { ApplicationContext ioc = new ClassPathXmlApplicationContext("beans.xml"); School school01 = ioc.getBean("school01", School.class); System.out.println("SchoolжаЕФprosЪєадШчЯТ : "); System.out.println(school01.getPros()); }

дЫааНсЙћ :

 БрМ
БрМ
7.ListЪєадзЂШыжЎЭЈЙ§utilУќУћПеМфзЂШы :
ЗНВХЮвУЧвбОМћЙ§СЫШчКЮЭЈЙ§propertyдЊЫизЂШыListРраЭЕФЪєадЃЌЦфЪЕЪЧЭЈЙ§listзгдЊЫиРДЪЕЯжЕФЁЃ
ФЧУДЃЌМйЩшЯждкИјГівЛИіашЧѓЃКвбжЊГЩЛЊДѓЕРЕНЖўЯЩЧХЕФТЗЩЯПЊзХСНМвЪщЕъЃЌЫќУЧЖМТєЁЖЩњЫРЦЃРЭЁЗЁЖОЕЛЈдЕЁЗЁЖЯцааЩЂМЧЁЗЁЖУїГЏФЧаЉЪТЖљЁЗЁЖШ§ЬхЁЗетМИБОЪщЃЌШУФудкbeans.xmlжаХфжУетСЉИіЪщЕъЖдЯѓЃЌФуФмТ№ЃП
ФуПЩФмЛсЫЕЃКгДЧЦФуетЛАЫЕЕФЃЌетВЛЪЧеХЗЩГдЖЙбПЁЊЁЊаЁВЫвЛЕњУДЃППДЮввЛВЈеХЗЩДЉеыЁЊЁЊДжжагаЯИЃЌИјФуећЕУУїУїАзАзЃЌЗўЗўЬћЬћЁЃ
гкЪЧФуОЭПЊећСЫЃЌЯШаТЖЈвхвЛИіBookStoreЕФJavaBeanРрЃЌДњТыШчЯТ :
package com.cyan.spring.bean;
import java.util.List;
public class BookStore {
    private List<String> bookList;
    public BookStore() {
    }
    public BookStore(List<String> bookList) {
        this.bookList = bookList;
    }
    public List<String> getBookList() {
        return bookList;
    }
    public void setBookList(List<String> bookList) {
        this.bookList = bookList;
    }
}

дйШЅbeans.xmlЮФМўжаХфжУвЛВЈЃЌДњТыШчЯТ :
<bean class="com.cyan.spring.bean.BookStore" id="bookStore01"> <property name="bookList"> <list> <value>ЩњЫРЦЃРЭ</value> <value>ОЕЛЈдЕ</value> <value>ЯцааЩЂМЧ</value> <value>УїГЏФЧаЉЪТЖљ</value> <value>Ш§Ьх</value> </list> </property> </bean> <bean class="com.cyan.spring.bean.BookStore" id="bookStore02"> <property name="bookList"> <list> <value>ЩњЫРЦЃРЭ</value> <value>ОЕЛЈдЕ</value> <value>ЯцааЩЂМЧ</value> <value>УїГЏФЧаЉЪТЖљ</value> <value>Ш§Ьх</value> </list> </property> </bean>

ФуЛЙВЛОЁаЫЃЌ МЬајШЅВтЪдРржаЖЈвхСЫвЛИіЕЅдЊВтЪдЕФЗНЗЈЃЌЩшЗЈЪфГіbookListЪєадНјааМьбщЃЌtestMySB()ЗНЗЈДњТыШчЯТ :
public void testMySB() { ApplicationContext ioc = new ClassPathXmlApplicationContext("beans.xml"); BookStore bookStore01 = ioc.getBean("bookStore01", BookStore.class); BookStore bookStore02 = ioc.getBean("bookStore02", BookStore.class); System.out.println("bookStore01's bookList = " + bookStore01.getBookList()); System.out.println("bookStore02's bookList = " + bookStore02.getBookList()); }

дЫааНсЙћ :

 БрМ
БрМ
ЖдДЫЃЌЮвжЛФмЫЕЃКЁАФу?ЪЧец?BбНЁБЁЃЪЧЕФЃЌЬЙАзЫЕФузіЕФеыВЛДСЖљЁЃЕЋЪЧФиЃЌМйШчЯждкГЩЛЊДѓЕРЕНЖўЯЩЧХЕФТЗЩЯгжПЊСЫ5МвЪщЕъЃЌИѓЯТгжШчКЮгІЖдФиЃП
ФуПЩФмЛсЯыЃКФЧЮвдйХф5ИіBeanВЛОЭЭъЪТЖљСЫУДЃЌетup?дѕУДФЅФЅпѓпѓЕФЃЌвѕбєЙжЦјЃЌФуЕНЕзЯыЫЕЩЖФуЫЕпТЃЌећетУДШЦвЛДѓШІзгЁЃЖдДЫЃЌЮвЯыЫЕЃКЁАФудйХф5ИіBeanвВШЗЪЕФмГЩЪТЖљЃЌЕЋЮвЫЕФуетУДХфОЭТ§СЫЃЌЮвУЧВЛНівЊХфЕУЖдЃЌЖјЧввЊХфЕУПьЁЃ
гкЪЧБувЊв§ГіutilУќУћПеМфСЫЁЃжБНгЩЯДњТы : (ЕБФуЪЙгУ<util:list>ЪБЃЌIDEAЛсздЖЏАяФув§ШыutilУќУћПеМф)
<util:list id="commonBookList"> <value>ЩњЫРЦЃРЭ</value> <value>ОЕЛЈдЕ</value> <value>ЯцааЩЂМЧ</value> <value>УїГЏФЧаЉЪТЖљ</value> <value>Ш§Ьх</value> </util:list> <bean class="com.cyan.spring.bean.BookStore" id="bookStore01"> <property name="bookList" ref="commonBookList"> </property> </bean> <bean class="com.cyan.spring.bean.BookStore" id="bookStore02"> <property name="bookList" ref="commonBookList"> </property> </bean>

ПЩвдПДЕНЃЌЦфЪЕОЭЪЧНЋДѓМвЖМгаЕФ?ЗХЕНСЫ<util:list></util:list>дЊЫижаЃЌШЛКѓдкУПИіBookStoreРраЭЕФBeanЖдЯѓжаЃЌРћгУrefв§гУЕН<util:list>жаЁЃОВтЪдЃЌЪфГіНсЙћЪЧвЛбљЕФЃЌетРяОЭВЛдйЗХЭМСЫЁЃ
8.МЖСЊЪєадзЂШы :
ЫљЮНЁАМЖСЊЪєадзЂШыЁБЃЌЦфЪЕжИЕФЪЧSpringЕФIOCШнЦїПЩвджБНгЮЊЁАЪєадЕФЪєадЁБИГжЕЃЌМДЕБРржаЮЌЛЄЕФФГИіЪєадгжЮЌЛЄгаздМКЕФЪєадЪБЃЌЮвУЧЯЃЭћдкХфжУИУРрBeanЖдЯѓЪБНЋЖдЯѓЪєадКЭЖдЯѓЪєадЕФЪєадЖМзЂШыЁЃ
ашЧѓ : ЖЈвхвЛИідБЙЄРрЃЌЮЌЛЄдБЙЄidЃЌдБЙЄаеУћЃЌдБЙЄЕФВПУХУћГЦШ§ИіЪєадЃЌЦфжаЃЌдБЙЄЕФВПУХУћГЦЭЈЙ§ВПУХРрЕФdeptNameЪєадБэЪОЁЃвЊЧѓЩшЗЈЪЕЯжЁАМЖСЊЪєадзЂШыЁБЁЃ
ЪзЯШЃЌЮвУЧашвЊЖЈвхдБЙЄРрКЭВПУХРрЃЌШчЯТ :
EmployeeРрДњТыШчЯТ :
package com.cyan.spring.bean; public class Employee { private Integer id; private String name; private Department department; public Employee() { } public Employee(Integer id, String name, Department department) { this.id = id; this.name = name; this.department = department; } public Integer getId() { return id; } public void setId(Integer id) { this.id = id; } public String getName() { return name; } public void setName(String name) { this.name = name; } public Department getDepartment() { return department; } public void setDepartment(Department department) { this.department = department; } public String toString() { return "Employee{" + "id=" + id + ", name='" + name + '\'' + ", department=" + department + '}'; } }

DepartmentРрДњТыШчЯТ:
package com.cyan.spring.bean; public class Department { private String deptName; public Department() { } public Department(String deptName) { this.deptName = deptName; } public String getDeptName() { return deptName; } public void setDeptName(String deptName) { this.deptName = deptName; } public String toString() { return "Department{" + "deptName='" + deptName + '\'' + '}'; } }

НгзХЃЌдкbeans.xmlЮФМўжаХфжУEmployeeЖдЯѓКЭDepartmentЖдЯѓЁЃДњТыШчЯТ :
<!-- ХфжУEmployeeРрЖдЯѓ --> <bean class="com.cyan.spring.bean.Employee" id="employee01"> <property name="id" value="1"></property> <property name="name" value="Cyan"></property> <property name="department" ref="department01"></property> <!-- [МЖСЊЪєадзЂШы] --> <!-- ЦфЪЕЪЧЭЈЙ§"ЖдЯѓУћ.ЪєадУћ"ЕФаЮЪНЃЌЖдЪєадЕФЪєадНјаазЂШыВйзї --> <property name="department.deptName" value="Back-End"></property> <!-- ДЫДІЃЌЕзВуЪЕМЪЕїгУСЫsetDeptNameЗНЗЈ --> </bean> <!-- ХфжУDepartmentРрЖдЯѓ --> <bean class="com.cyan.spring.bean.Department" id="department01"/>

зюКѓЃЌдкВтЪдРрStudentBeanByXMLжааТЖЈвхвЛИіЕЅдЊВтЪдЗНЗЈЃЌЪфГіХфжУЕФEmployeeЖдЯѓЃЌВщПДМЖСЊЪєадзЂШыЪЧЗёГЩЙІЁЃtestCascade()ЗНЗЈДњТыШчЯТ :
//PS : ВтЪдМЖСЊЪєадИГжЕ public void testCascade() { ApplicationContext ioc = new ClassPathXmlApplicationContext("beans.xml"); Employee employee01 = ioc.getBean("employee01", Employee.class); System.out.println("employee01 = \n" + employee01); }

дЫааНсЙћ :

 БрМ
БрМ
ПЩвдПДЕНЃЌemployeeЖдЯѓЕФЪєадdepartmentЕФЪєадdeptNameБЛГЩЙІГѕЪМЛЏЃЌЫЕУїМЖСЊЪєадзЂШыГЩЙІЁЃ
ЦпЁЂЭЈЙ§ОВЬЌЙЄГЇЛёШЁBean
1.ЛљБОНщЩм :
ЁАЭЈЙ§ОВЬЌЙЄГЇЛёШЁBeanЁБЃЌБОжЪЩЯЛЙЪЧЁАЛљгкXMLЗНЪНХфжУBeanЁБЃЛжЛВЛЙ§ЮвУЧВЂВЛжБНгдкХфжУBeanЪБОЭЮЊBeanЖдЯѓзЂШыЪєадЃЌЖјЪЧЪТЯШдкОВЬЌЙЄГЇРрЕФstaticДњТыПщжаЭъГЩСЫГѕЪМЛЏЃЈгУОВЬЌЕФMapШнЦїРДДцДЂStudentРрЖдЯѓЃЉЃЌВЂЬсЙЉСЫвЛИіОВЬЌЗНЗЈгУгкЛёШЁвбОГѕЪМЛЏКУЕФStudentЖдЯѓЃЌШЛКѓдкbeans.xmlХфжУЮФМўжаЃЌЮвУЧжЛашвЊИјЖЈвЛИіkeyЃЌВЂжИЖЈЕїгУОВЬЌЙЄГЇЬсЙЉЕФгУгкЛёШЁStudentЖдЯѓЕФЗНЗЈЃЌSpringШнЦїБуПЩвдИљОнИУkeyЛёШЁЕНЖдгІЕФStudentРрЖдЯѓЁЃ
зЂвт :
(1) ЁАЭЈЙ§ОВЬЌЙЄГЇЛёШЁBeanЁБЃЌдкХфжУbeanЪБЃЌclassВЛдйЪЧStudentРрЕФШЋТЗОЖЃЌЖјЪЧОВЬЌЙЄГЇРрЕФШЋТЗОЖ.
(2) Г§СЫidКЭclassЭтЃЌЛЙашвЊвЛИіЪєадfactory-methodЃЌБэЪОжИЖЈвЛИіОВЬЌЙЄГЇРрЕФгУгкЗЕЛиBeanЖдЯѓЕФЗНЗЈ.
(3) жСгкbeanдЊЫиФкВПЃЌдђашвЊЪЙгУ<construcotr-arg value="key"/>БъЧЉЃЌЫЕУївЊЛёШЁЕФЖдЯѓдкОВЬЌЙЄГЇРржаЖдгІЕФkeyЁЃ
2.гІгУЪЕР§ :
ЩЯУцЫЕСЫвЛЖбЃЌжЛЪЧПДПЯЖЈЖрЩйОѕЕУвЛЭЗЮэЫЎЃЌЯТУцЮвУЧРДИіЪЕР§ИаЪмвЛЯТЁЃ
ЪзЯШЃЌupЖЈвхвЛИіздМКЕФОВЬЌЙЄГЇРрЃЌCyanStaticFactoryРрДњТыШчЯТ :
package com.cyan.spring.factory; import com.cyan.spring.bean.Student; import java.util.HashMap; import java.util.Map; public class CyanStaticFactory { //ЮЌЛЄвЛИіОВЬЌMapМЏКЯЃЌгУгкБЃДцStudentЖдЯѓ private static Map<String, Student> studentMap; //дкОВЬЌДњТыПщжаГѕЪМЛЏStudentЖдЯѓ static { studentMap = new HashMap<>(); studentMap.put("student01", new Student("Cyan", 21, 450)); studentMap.put("student02", new Student("Rain", 19, 460)); } //ЬсЙЉвЛИіЛёШЁStudentЖдЯѓЕФОВЬЌЗНЗЈ public static Student getStudent(String key) { return studentMap.get(key); } }

ШЛКѓдкbeans.xmlЮФМўжаЭъГЩХфжУЃЌДњТыШчЯТ : ЃЈзЂвтПДupХфжУЕФidЃЌБэУїзюжеЗЕЛиЕФЦфЪЕЪЧвЛИіStudentРрЖдЯѓЃЉ
<bean class="com.cyan.spring.factory.CyanStaticFactory" id="stu07"
        factory-method="getStudent">
        <constructor-arg value="student02"/>
    </bean>

зюКѓЃЌШдШЛЪЧдкВтЪдРрStudentBeanByXMLжаЃЌЖЈвхвЛИіЕЅдЊВтЪдЗНЗЈЃЌЛёШЁЕНStudentЖдЯѓЃЌ
getBeanByStaticFactory()ЗНЗЈДњТыШчЯТ : ЃЈзЂвтДЫДІgetBeanЗНЗЈЕУЕНЕФЪЧStudentРраЭЕФЖдЯѓЃЉ
//6.ЭЈЙ§ОВЬЌЙЄГЇЛёШЁBean public void getBeanByStaticFactory() { ApplicationContext ioc = new ClassPathXmlApplicationContext("beans.xml"); Student stu07 = ioc.getBean("stu07", Student.class); System.out.println(stu07); }

дЫааНсЙћ :

 БрМ
БрМ
АЫЁЂЭЈЙ§ЪЕР§ЙЄГЇЛёШЁBean
1.ЛљБОНщЩм :
ЁАЭЈЙ§ЪЕР§ЙЄГЇЛёШЁBeanЁБЃЌКЭЭЈЙ§ОВЬЌЙЄГЇЛёШЁBeanРрЫЦЃЌжЛВЛЙ§МћУћжЊвтЃЌЮвУЧдкздЖЈвхЪЕР§ЙЄГЇРржаЭЈЙ§ЗЧОВЬЌMapШнЦїРДДцДЂStudentРрЖдЯѓЃЌВЂдкЗЧОВЬЌДњТыПщжаЖдMapШнЦїНјааГѕЪМЛЏЃЌВЂЬсЙЉвЛИігУгкЛёШЁStudentЖдЯѓЕФЗЧОВЬЌЗНЗЈЁЃШЛКѓдкbeans.xmlЮФМўжаЃЌГ§СЫжИЖЈвЛИігУгкЛёШЁBeanЖдЯѓЕФЗНЗЈЃЌвдМАИјГіkeyЭтЃЌБиаыЯШжИЖЈвЛИіЪЕР§ЙЄГЇЖдЯѓЁЃ
ЛиЙЫвЛЯТДњТыПщЁЊЁЊ
ОВЬЌДњТыПщЫцзХРрЕФМгдиЖјБЛвўЪНЕиЕїгУЃЌзюЖржЛФмжДаавЛДЮЃЛЖјЖдгкЗЧОВЬЌДњТыПщЃЌУПЪЕР§ЛЏвЛДЮАќКЌИУЗЧОВЬЌДњТыПщЕФРрЃЌЖМЛсжДаавЛДЮИУРржаЕФЗЧОВЬЌДњТыПщЁЃ
НсКЯДњТыПщЕФФкШнЛиЙЫЃЌЮвУЧПЩвдВТЕНЃКБиаыЯШЪЕР§ЛЏЁАЪЕР§ЙЄГЇЖдЯѓЁБЃЌвджДааЦфЗЧОВЬЌДњТыПщжаЕФФкШнЃЌЭъГЩЖдЗЧОВЬЌMapМЏКЯЕФГѕЪМЛЏЃЛШЛКѓВХФмЛёШЁЕНЦфБЃДцЕФбЇЩњЖдЯѓЁЃ
зЂвт :
(1) ЁАЭЈЙ§ЪЕР§ЙЄГЇЛёШЁBeanЁБЃЌдкХфжУbeanЪБЃЌашвЊЭЌЪБХфжУЪЕР§ЙЄГЇЖдЯѓКЭбЇЩњЖдЯѓ.
(2) Ъєадfactory-methodЃЌБэЪОжИЖЈвЛИіЪЕР§ЙЄГЇРрЕФгУгкЗЕЛиBeanЖдЯѓЕФЗНЗЈЃЛЪєадfactory-beanЃЌБэЪОжИЖЈЪЙгУвЛИіЬиЖЈЕФЪЕР§ЙЄГЇЖдЯѓЗЕЛиBeanЁЃ
(3) beanдЊЫиФкВПЃЌШдашвЊЪЙгУ<construcotr-arg value="key"/>БъЧЉЃЌЫЕУївЊЛёШЁЕФЖдЯѓдкЪЕР§ЙЄГЇРржаЖдгІЕФkeyЁЃ
2.гІгУЪЕР§ :
ЪзЯШЃЌupЖЈвхвЛИіздМКЕФЪЕР§ЙЄГЇРрЃЌCyanInstanceFactoryРрДњТыШчЯТ :
package com.cyan.spring.factory;
import com.cyan.spring.bean.Student;
import java.util.HashMap;
import java.util.Map;
public class CyanInstanceFactory {
    private Map<String, Student> studentMap;
    {
        studentMap = new HashMap<>();
        studentMap.put("student03", new Student("Eisen", 22, 437));
        studentMap.put("student04", new Student("Five", 20, 429));
    }
    public Student getStudent(String key) {
        return studentMap.get(key);
    }
}

ШЛКѓдкbeans.xmlЮФМўжаЭъГЩХфжУЃЌДњТыШчЯТ :
<!-- ХфжУЪЕР§ЙЄГЇЖдЯѓ --> <bean class="com.cyan.spring.factory.CyanInstanceFactory" id="cyanInstanceFactory01"/> <!-- ХфжУбЇЩњЖдЯѓ --> <bean id="stu08" factory-bean="cyanInstanceFactory01" factory-method="getStudent"> <constructor-arg value="student03"/> </bean>

зюКѓЃЌШдШЛЪЧдкВтЪдРрStudentBeanByXMLжаЃЌЖЈвхвЛИіЕЅдЊВтЪдЗНЗЈЃЌЛёШЁЕНStudentЖдЯѓЃЌ
getBeanByInstanceFactory()ЗНЗЈДњТыШчЯТ :
//7.ЭЈЙ§ЪЕР§ЙЄГЇЛёШЁBean public void getBeanByInstanceFactory() { ApplicationContext ioc = new ClassPathXmlApplicationContext("beans.xml"); Student stu08 = ioc.getBean("stu08", Student.class); System.out.println(stu08); }

дЫааНсЙћ :

 БрМ
БрМ
ОХЁЂЭЈЙ§FactoryBeanЛёШЁBean
1.ЛљБОНщЩм :
ЁАЭЈЙ§FactoryBeanЛёШЁBeanЁБЃЌгжКЭЩЯЮФжаЭЈЙ§ЪЕР§ЙЄГЇЛёШЁBeanРрЫЦЃЌЖМЪЧЮЌЛЄСЫвЛИіЗЧОВЬЌMapШнЦїРДБЃДцBeanЖдЯѓЃЌВЂдкЗЧОВЬЌДњТыПщжаЖдMapШнЦїНјааГѕЪМЛЏЃЌВЛЙ§ВЛЭЌЕФЕиЗНдкгкЃЌДЫДІЛЙашвЊдкРржаЕЅЖРЮЌЛЄвЛИіStringРраЭЕФkeyЪєадЁЃВЂЧвЃЌЮвУЧашвЊШЅЪЕЯжFactoryBean<>НгПкЃЌВЂжиаДНгПкжаЕФЗНЗЈЁЃ
зЂвт :
(1) ЁАЭЈЙ§FactoryBeanЛёШЁBeanЁБЃЌдкХфжУbeanЪБЃЌclassЮЊFactoryBeanЕФШЋРрУћ.
(2) ЭЈЙ§propertyзгдЊЫиЮЊkeyЪєадГѕЪМЛЏЁЃ
2.гІгУЪЕР§ :
ЪзЯШЃЌЮвУЧашвЊЖЈвхвЛИіздМКЕФFactoryBeanРрВЂЪЕЯжFactoryBeanНгПкЃЌCyanFactoryBeanРрДњТыШчЯТ :
package com.cyan.spring.factory; import com.cyan.spring.bean.Student; import org.springframework.beans.factory.FactoryBean; import java.util.HashMap; import java.util.Map; public class CyanFactoryBean implements FactoryBean<Student> { private String key; private Map<String, Student> studentMap; { studentMap = new HashMap<>(); studentMap.put("student05", new Student("Irving", 32, 427)); studentMap.put("student06", new Student("Rose", 23, 431)); } public void setKey(String key) { this.key = key; } public Student getObject() throws Exception { return studentMap.get(key); } public Class<?> getObjectType() { return Student.class; } public boolean isSingleton() { return FactoryBean.super.isSingleton(); } }

НгзХЃЌдкbeans.xmlжаХфжУbeanЖдЯѓЃЌДњТыШчЯТ :
<!-- ХфжУStudentЖдЯѓЃЌЭЈЙ§FactoryBeanЛёШЁ --> <bean class="com.cyan.spring.factory.CyanFactoryBean" id="stu09"> <property name="key" value="student05"/> </bean>

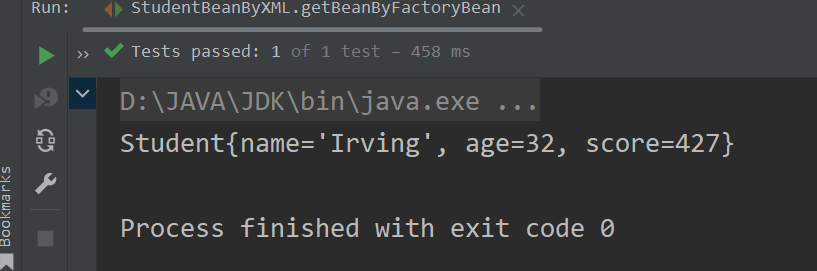
зюКѓЃЌдкStudentBeanByXMLВтЪдРржаЖЈвхвЛИіЕЅдЊВтЪдЗНЗЈЃЌВтЪдЪЧЗёХфжУГЩЙІЁЃgetBeanByFactoryBean()ЗНЗЈДњТыШчЯТ :
//8.ЭЈЙ§ЪЕР§ЙЄГЇЛёШЁBean public void getBeanByFactoryBean() { ApplicationContext ioc = new ClassPathXmlApplicationContext("beans.xml"); Student stu09 = ioc.getBean("stu09", Student.class); System.out.println(stu09); }

дЫааНсЙћ :
 БрМ
БрМ
ЪЎЁЂЙигкBeanХфжУЕФИќЖрФкШнКЭЯИНк
гЩгкЁАSpring IOCЁЊЛљгкXMLХфжУКЭЙмРэBeanЁБФкШнНЯЖрЃЌЖјupаДЕНетРяЪББрМЦївбОКмПЈСЫ?ЁЃЙЪДђЫуНЋBeanХфжУаХЯЂжигУЃЌBeanЩњУќжмЦкЃЌвдМАBeanКѓжУДІРэЦїЕШФкШнЕЅЖРЗХвЛЦЊЮФеТжаЁЃ
СДНгШчЯТ :
Д§ИќаТ---??2023/12/9 вбИќаТЃЈЕуЛїЯТЗНСДНгЬјзЊЃЉ
Spring IOCЁЊЛљгкXMLХфжУBeanЕФИќЖрФкШнКЭЯИНкЃЈЭЈЫзвзЖЎЃЉ-CSDNВЉПЭ
ЪЎвЛЁЂзмНс
- ?ЃЌвдЩЯОЭЪЧSpringЯЕСаВЉЮФЕкЖўаЁНкЕФШЋВПФкШнСЫЁЃ
- змЕФРДПДЃЌSpring ЛљгкXMLХфжУКЭЙмРэBeanФкШнКмЖрЃЌЮвУЧПЩвдЭЈЙ§ЖржжЗНЪНЛёШЁBeanЛђепЮЊBeanзЂШыЪєадЃЌзувдИаЪмЕНSpringХфжУКЭЙмРэBeanЕФСщЛюадЁЃдйРДМђЕЅЛиЙЫвЛЯТЩЯЮФЕФзмЪіЃЌШчЯТЭМЫљЪО :

БрМ
- ЯТвЛНкФкШнЁЊЁЊSpring IOCЁЊЁЊЛљгкзЂНтХфжУКЭЙмРэBeanЁЃИааЛдФЖСЃЁ
System.out.println("END-------------------------------------------------");